Hello future LCD replacers. I hope it goes well. This process seems scary and is made even more scary by voiding the warenty. But it is cheap and fairly easy, so give it a shot. I hope these photos and tips will help. These photos are of a SD600 but they may well be good for most similar Canon digital cameras.See the comments linked from the bottom of the page for some additional tips and encouragement. I try to add them in as the come but they might be worth checking out. And for those of you who have commented THANK YOU I appreciate the kind words.
 Diagnosis: First determine that a cracked LCD is the problem. Here this is very clearly the case. The backlight is still functioning. This can be seen because a bright white light is still coming through but images are not present. If the display is completely black the problem may be the backlight and not the LCD. Replacing the backlight is very similar but not shown here.
Finding the parts: To order a new LCD for the Cannon SD600 you need to find out which of two different screens are in your camera. I found this out by calling the Canons Eastern USA suplier. 732-521-7007. They will sell you a new screen for about $50 including shipping once you know which screen you need.
step 0: take out the battery and memory card (thanks 4salmon I forgot to write this step down)
First remove the six exterior screws shown below. Two on the left, two on the right and two on the bottom(shown with one already removed).


 Next gently remove the casing. It should come off in four pieces. A front, back and right panel and a small circular piece that is inset in the right panel.
Once the back panel is removed you can tell which LCD screen is needed. You are looking for the presence or absence of the word "SONY" on the left side of the metal rim around the LCD screen. When ordering the part tell them which one you have.

You can now order the correct part.(732-521-7007 in the US)To continue removing the LCD screen take out the screw in the upper right hand corner above the LCD screen.
 Once the screw is removed gently slide the the screen to the left. Lightly lifting the piece of clear plastic next to the screw hole might be necessary.
 Now you should be able to lift the LCD screen while it is still attached to the backlight. Two ribbon cables come out from them. The thicker is for the LCD screen and the thinner is for the backlight. The thicker is attached to the back of the backlight with adhesive.
Gently pry the LCD screen away from the backlight. You may need to use a small flat head screw driver.

Between the screen and backlight there is a a thin plastic sheet.

After separating the the LCD from the backlight peel the thick cable off of the back of the backlight. There is no need to clean off the remaining adhesive it will be useful with the new LCD cable.Next flip the the camera over and pull out the thick ribbon cable from its socket. Now tape a strip of paper to the end of the cable (props to this website for this great idea). This will allow you to easily thread the new cable.(UPDATE: It may be easier to do this by removing the tripod piece instead of threading it with paper. See Jamie's comment. I would love to know how this works for people as I would rather not take mine apart again just to look. 1/28/08: This has been confirmed.)
 Now pull the ribbon through leaving the paper in the place where the ribbon was.
 Cut the paper and discard the old LCD screen.Press the new LCD screen on to the backlight until it clicks into place.Now tape the ribbon for the new LCD screen to the paper and pull the paper through
 Carefully pull the new ribbon through. Press the ribbon against that back of the backlight, it should stick to the old adhesive.Slide the backlight and LCD into their old position (from the left to the right). Now replace the screw in the upper right hand corner.

Now remove the paper from the ribbon and attach plug the ribbon cable into its socket. Make sure to push it in deep. I did this by putting a small screwdriver into each of the two small holes on the side of the ribbon and pushing the ribbon into the socket.
 Once the cable is plugged in all that remains is to reassemble the case and replace the six screws of the exterior case. It is easiest to put them on in the order: Back, right and than front. When putting on the back panal make sure the switch on the panal is in the same position as the switch on the camera.
 I had a problem that once the new screen was in place it showed a black screen in camera mode. I fixed this by holding down the menu key, turning it on and off and reseting the menu options. I am not sure which one is correct so try one at a time and tell me which one worked.(UPDATE Anonymous posted:To get the LCD to display in "camera mode" go to settings and do a "Reset All..."This should take care of the LCD being blank in camera mode.)

You can now order the correct part.(732-521-7007 in the US)To continue removing the LCD screen take out the screw in the upper right hand corner above the LCD screen.
Once the screw is removed gently slide the the screen to the left. Lightly lifting the piece of clear plastic next to the screw hole might be necessary.Now you should be able to lift the LCD screen while it is still attached to the backlight. Two ribbon cables come out from them. The thicker is for the LCD screen and the thinner is for the backlight. The thicker is attached to the back of the backlight with adhesive.Gently pry the LCD screen away from the backlight. You may need to use a small flat head screw driver.
Between the screen and backlight there is a a thin plastic sheet.

After separating the the LCD from the backlight peel the thick cable off of the back of the backlight. There is no need to clean off the remaining adhesive it will be useful with the new LCD cable.Next flip the the camera over and pull out the thick ribbon cable from its socket. Now tape a strip of paper to the end of the cable (props to this website for this great idea). This will allow you to easily thread the new cable.(UPDATE: It may be easier to do this by removing the tripod piece instead of threading it with paper. See Jamie's comment. I would love to know how this works for people as I would rather not take mine apart again just to look. 1/28/08: This has been confirmed.)
Now pull the ribbon through leaving the paper in the place where the ribbon was.Cut the paper and discard the old LCD screen.Press the new LCD screen on to the backlight until it clicks into place.Now tape the ribbon for the new LCD screen to the paper and pull the paper throughCarefully pull the new ribbon through. Press the ribbon against that back of the backlight, it should stick to the old adhesive.Slide the backlight and LCD into their old position (from the left to the right). Now replace the screw in the upper right hand corner.
Now remove the paper from the ribbon and attach plug the ribbon cable into its socket. Make sure to push it in deep. I did this by putting a small screwdriver into each of the two small holes on the side of the ribbon and pushing the ribbon into the socket.
 Once the cable is plugged in all that remains is to reassemble the case and replace the six screws of the exterior case. It is easiest to put them on in the order: Back, right and than front. When putting on the back panal make sure the switch on the panal is in the same position as the switch on the camera.I had a problem that once the new screen was in place it showed a black screen in camera mode. I fixed this by holding down the menu key, turning it on and off and reseting the menu options. I am not sure which one is correct so try one at a time and tell me which one worked.(UPDATE Anonymous posted:To get the LCD to display in "camera mode" go to settings and do a "Reset All..."This should take care of the LCD being blank in camera mode.)


 I did a powerup here to check that I hadn’t messed anything up at this point, and ’cause I didn’t have a picture of the screen in all it’s glory.This may have been a shock risk or just stupid, I don’t know.
 At this point I installed an InvisibleSHIELD on the new screen while it was still outside the camera
 Removal of screw number 7, this screw is a different size than the others, so don’t get it mixed up.
 This is one of the hardest parts of the whole procedure. The backlight and LCD are held together with a series of metal clips that have to be freed before you can replace the screen. I used a small flat head screwdriver to wedge in between the two and try to get the claps undone. This is also the part I have the worst pictures of. The goal is not to get the LCD off right now; it’s just to get it detached from the backlight.


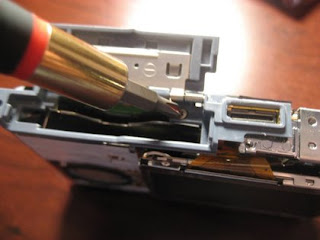 Step 4: Seperate the LCD from the Backlight and both from the body of the camera. They can be removed by taking a small flathead screwdriver and prying gently (note: there is a little glue holding the backlight onto the body of the camera). Fold down the LCD unit.

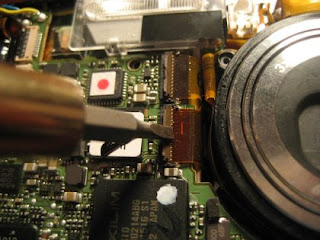 Step 7: Pass the ribbon of the LCD and the blacklight so that they are fully on the front side of the camera (DO NOT PULL ON THE WIRES FOR THE BACKLIGHT).
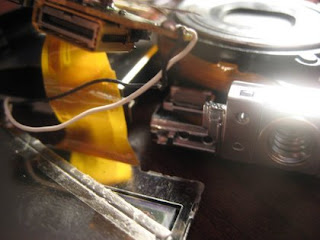 Step 8: Flip over the main circuit board so you can see where the LCD ribbon attaches (it will be on the same side that the SD card is inserted)