PLEASE READ THIS FIRST !

Oh no! You've dropped your digital camera. And it's out of warranty. And repair costs more than the camera is worth. What to do short of tossing the camera (or selling on ebay)? Well, believe it or not the average person has a good chance of diy fixing that camera themselves. All they'll need for most cases is some patience, and a little background knowledge. The intent of the posts on this blog are to help provide that knowledge.

But now for the WARNINGS! Many of the repairs posted here should only be considered as a last resort for a broken camera that would otherwise be considered for disposal. Also please consider those repairs that require removing the camera case to also require some electrical background and knowledge, and should not be attempted by anyone unfamiliar with basic electrical components and safety precautions.

Make sure you read this post and are aware of the potential DANGER OF SEVERE ELECTRICAL SHOCK should you decide to proceed with a "do it yourself" repair that involves removing the camera case.
Showing posts with label SD600. Show all posts

Sunday, July 26, 2009

This is how I fixed my Canon SD600 with Lens Error.

Out of the blue my Canon SD600 showed "Lens Error" after I turned it on. The lens was normally retracted and didn't even seem to try to come out. Even if switched to "play" mode it showed Lens Error and didn't get to the menu.

I went online and noticed this is a BIG problem for many people with Canon's. One option offered was to push the lens back in - but since the lens is fully retracted in my (and many other cases) that is not an option. Another option mentioned was to tap the camera on a hard surface. That didn't work either.

Since the Camera is out of warranty (just 2 weeks!) I decided to open it and see what I could do.

It turns out I could fix it!!!

The problem seems that miniscule dust/sand particles jam the gears which moves the lens. It is possible to turn the lens motor by hand bit by bit and remove particles stuck in the gear.

I will explain in detail below, including pictures. Note: these photo's were made with my 2002 Konica KD-400Z - still working great, while this is the 2nd (and last) Canon.

Step 1: Remove all 6 screws with a miniature philips screwdriver (2 bottom, 2 left, 2 right). They are all the same size screws.

Carefully remove front cover, then the back cover. This is what you will see:

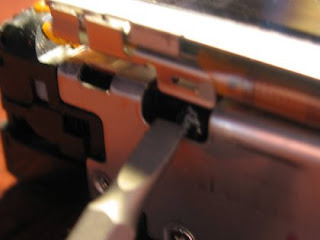
The lens motor is located behind the flash. With a miniature screw driver it is possible to push this rotor around bit by bit. It takes some time and precision, but you can very slowly see the lens coming out. The rotor must be rotated towards the back of the camera for the lens to open. In other words: the axle should be rotated clockwise.

When I switched the camera on after a few revolutions, it actually worked again! Problem solved!

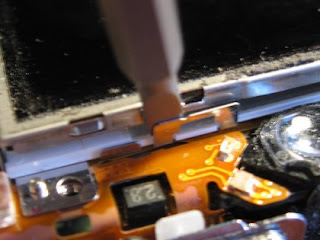
However, I wanted to remove the root cause of the problem. I could hear the gear didn't go very smooth, little "ticks" could be heard. It seems small pieces of sand and dust were jamming the lens gear. The lens gear (well, at least 2 gears) can be seen on the side of the camera - see picture below:

I used the smallest screw driver and a needle pin to pick out particles of sand/dust which were stuck between the gear. They are easy to see on the black gear, but they were also present on the white gear. I worked the entire gear by pushing the motor rotor bit by bit with the miniature screw driver. I continued until I removed all particles. This took me 10-15 minutes.

Warning: Don't touch the Flash - the capacitor is charged with 20 kV or so - it will give you quite a shock.

After this the lens opening and closing went smooth - without odd noises or ticking.

I inspected the inside of the camera, and noticed more sand/dust particles were present. I cleaned it all up, to avoid them from jamming the gear again. There was a lot of sand stuck in the speaker (round black circle on the back) and a LOT of sand was stuck on the rectangular rubber seal on the inside cover. See picture:


I think the Canon's suffer from these lens problems because sand/dust can enter the camera - especially if they are put in your pockets. Canon should have sealed the gears so sand/dust can not enter. Maybe it's a strategy, maybe they don't like the camera's last too long or like to earn a buck on repairing them.

After fixing it and cleaning everything, the camera can be closed again. Start with the back cover. Pay close attention to make sure the mode switch slider (play, movie, camera) is catching the switch lever correctly. After placing the back cover, but before putting in any screws check if the mode switch can be operated normally.

Then carefully place the front cover and position the piece of plastic for the carry-cord. Fasten the 6 screws.

I hope this information helped you fix your Canon.

Kind Regards, Arnoud.

Saturday, July 25, 2009

Check your warranty Canon SD600

Check your warranty Canon SD600

Most cameras have a 1 year warranty. If your camera is still under warranty you may want to see if you can get the camera professionally repaired free. Look at the details of your warranty. Most companies have you write a letter stating how the problem occurred (ie: LCD wouldn't turn back on after transferring pictures). Cracked LCD's are harder to explain because the warranty doesn't cover you if you dropped the camera. If you purchased a warranty package at a retail store (such as Circuit City or Best Buy), their plan may cover accidental damage. If you did drop it, and plan on sending the unit to the manufacturer, do not admit to dropping it, lie.
Recognize the problem
Before you begin to tear into your camera, make sure it is a problem that you are comfortable repairing. A lens problem requires a much more invasive repair compared to changing an LCD.
Avoid static damage
The first time I tried to repair a digital camera, I did everything correct, except one thing. I did not take the proper precautions to make sure I wouldn't damage the circuitry of my camera with a static charge. The camera I tried to repair thus needed even more repair than when I started.
Here are a few precautions you can take to avoid damaging your camera with static electricity:
1) Remove the battery from your camera before you open the case
2) Wear anti-static latex gloves, or a wrist strap that grounds you.
3) Try to keep your body at the same electric potential as the camera.
You can do this by touching something metal (non-electrical) on the camera at different points during the procedure. For example, I know most Canon's have a metal frame holding their shape.
Keep track of materials
There is nothing worse than closing up your camera after a successful repair and realizing you don't have enough screws, or just as bad, realizing you have too many screws.
Here are a few tricks that you can follow to make sure you don't lose any screws and so that you remember where every screw was removed from:
1) Do all of your work over a paper plate. This way, if you do drop a screw, the edges of the plate won't let it roll away.
2) As you remove each screw, tape it to the plate or a piece of paper and label where it was removed from (ie: 'top of LCD'; 'housing case left bottom'; 'under LCD top right'; etc.)
3) Even though a magnetized screwdriver would make loosing screws more difficult, one should not be used because it may interfere with the electrical and mechanical parts of the camera
4) If you want you can sketch the camera on a sheet of paper and tape the screw on corresponding area of the sketch.

How To Replace a Broken LCD Canon Powershot SD600

if you have a damaged LCD follow the steps below to repair this
problem.

Note: The SD600 is very similar to the SD200, SD300 & SD400,
so if you want to look at those to get an idea of what to do it is
suggested

Step 1: Make sure that the LCD is what is the problem and that
by fixing this the camera will be like new again. The best way to do this
is to take the A/V cable that came with the camera and plug it into the camera
and TV (A/V slot on camera found by the USB cable) [i didn't have a SD600 that
was broken, so I took apart my the camera I use to demonstrate]


Step 2: Unscrew housing, keeping track of the screws.
You should have a total of six (6) screws (2 from each side and 2 from the
bottom)

Step 3: Separate the LCD/backlight unit from the whole
camera. To do this there is a small screw on the top right of the
LCD. There are also two clasps, one to the left of the LCD and one at the
bottom left of the LCD. Do not lift the LCD/backlight yet...wait until the
next step.


Step 5: Remove the ribbon for the backlight (located under the
LCD/backlight unit.


Step 6: Remove the ribbon for the LCD (located on the
front of the camera). After the ribbon is removed, tape a piece of paper
no thicker than the ribbon itself and at least 5 inches long.


Step 7: Gently thread the ribbon and paper under the main
circuit. It may be easier to loosen the circuit by removing the screw
shown below (bottom right on the front of the camera). make sure the paper
doesn't tear. This step takes some patience. Once the paper is
through remove the tape from the LCD ribbon. Make sure the paper is still
on both sides of the camera.


Step 8: Now separate the broken LCD from the backlight.
There are little notches (2 on top and 2 on bottom - one on the bottom is
covered in black tape). [i didn't actually do this step because my LCD
isn't broken and I don't want to accidentally scratch anything, but i
demonstrated how it should look - if you look at the sd200 page you should get
an idea of how it should look too]

Step 9: Now get the new LCD. (information on how to get a new LCD
can be found on the repair shop link). Attach it to the backlight, then
attach the LCD ribbon to the strip of paper. Pull on the paper gently so
that the ribbon now goes through completely. (be sure that you get no
fingerprints on the back of the LCD or on the front of the backlight because
they will remain there.
Step 10: Attach the LCD ribbon to the
camera. Make sure it is FULLY inserted. Wipe off any
fingerprints

Step 9: Replace the housing.

Step 10: Insert the battery and test to see if the LCD unit works.

[sorry about the blurry pictures, I usually am using the SD600 to take
photos, but for obvious reasons I was unable to]


Congratulations, you did it!!!!


Didn't work? - If you only see white, this means that there is either a
problem with the LCD unit you inserted, or that you failed to insert the ribbon
fully. If you see an image, but is dark, then the backlight ribon was not
replaced correctly or fully. If the camera doesn't power on, then you may
have shorted a circuit, and failed to take the proper precautions as mentoined
here.