Step 1: Make sure that the LCD is what is the problem and that by fixing this the camera will be like new again. The best way to do this is to take the A/V cable that came with the camera and plug it into the camera and TV (A/V slot on camera found by the USB cable)
 Step 2: Unscrew housing, keeping track of the screws. You should have a total of six (6) screws (4 from the bottom and 1 on each side). You should also have where the wrist strap attaches (that comes off).
Step 3: Remove the housing and then remove the battery cover by removing the screw shown below (now total of 7 screws)
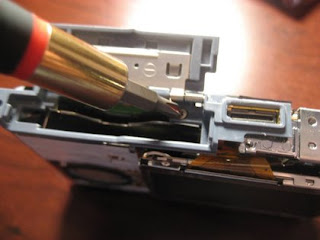 Step 4: Seperate the LCD from the Backlight and both from the body of the camera. They can be removed by taking a small flathead screwdriver and prying gently (note: there is a little glue holding the backlight onto the body of the camera). Fold down the LCD unit.
 Step 5: Turn the camera over and remove the screw on the main circuit board of the camera (now total of 8 screws)
 Step 6: Remove the ribbons attach the lens to the main circuit
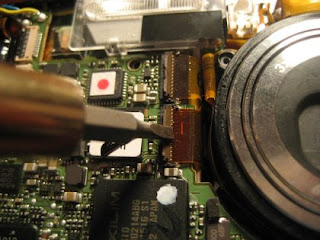 Step 7: Pass the ribbon of the LCD and the blacklight so that they are fully on the front side of the camera (DO NOT PULL ON THE WIRES FOR THE BACKLIGHT).
 Step 8: Flip over the main circuit board so you can see where the LCD ribbon attaches (it will be on the same side that the SD card is inserted)
 Step 9: Now get the new LCD. (information on how to get a new LCD can be found on the repair shop link).
Step 10: Attach the LCD ribbon to the camera. Make sure it is FULLY inserted.
Step 11: Reverse the steps, being sure to fully insert the ribbons for the lens and putting back all the parts in the correct order. There is nothing worse than finishing and seeing a small part or screw that belongs on the inside of the camera still on your work station.
Step 12: Replace the housing. Use a microfiber cloth to wipe off any finger prints that may be on the new LCD, or on the inside of the plastic covering the LCD. They will show after the unit is closed and you will not be able to get rid of them without re-opening the unit
Step 13: Insert the battery and test to see if the LCD unit works. \
Congratulations, you did it!!!!
Didn't work? - If you only see white, this means that there is either a problem with the LCD unit you inserted, or that you failed to insert the ribbon fully. If you see an image, but is dark, then the backlight power was removed. You can repair this with a steady hand and some solder, or bring it to a jeweler who has the correct materials and know how, or bring it to a repair shop, but if you were willing to do that you wouldn't be here in the first place. If the camera doesn't power on, then you may have shorted a circuit, and failed to take the proper precautions as mentoined here.
No comments:
Post a Comment